Sunday, August 22, 2004

Broken bolt in block

Once finished with the heater box I again started working on getting the engine ready to go back in. I started on the motor mount "ears" when I noticed a broken bolt in one of the bolt holes for the motor mounts.

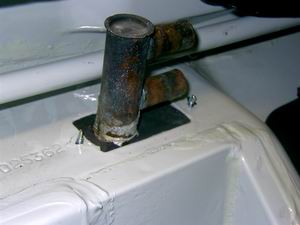
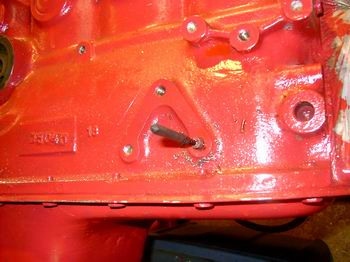
I remembered that I knew about this broken bolt and I had asked the machine shop to remove it when they rebuilt the engine. Apparently I didn't tell them or they didn't do it. I soaked the bolt in PB Blaster before I headed off to town.

I had broken my last screw/bolt extractor a few years ago so I decided it was off to Sears for some of new fangled bolt extractor Bob was yacking about on TV. First at Lowes they had the new fangled style for nearly $30. Over to Sears, at least they sell things that can break by the piece.

At sears the set was $12 and I picked up a couple of the old reverse screw style.

So I try the old style - and to my amazement the bolt back out with very little effort. My best guess is the bolt was broken during tightening and not removal. At last a bit of good luck.


Now I just need to find an O-ring and the nut for the oil cooler.

Labels:

Saturday, August 21, 2004

*&#$ forgot the heater valve tube

Well I had the heater box installed but I for got to install the capillary tubing for the heater control valve.


So I take the box out, run the capillary tubing in along the core and install the valve in the firewall. See how nice it went in with a new gasket at the firewall.


Now I thought I was finished with the heater box. So I move onto getting some things bolted back on the engine when in a bag labeled as holding engine parts I find I discovered those little spring steel clips that hold the doors closed. So out again comes the heater box. I am beginning to get good at this.

Now I notice that when I assembled the box the capillary tube was crushed. *&%@, however it looks like the internal brass colored tube was intact - I hope that is the one that matters since new valves run about $150. So I splint the 1/8 copper tubing with some 1/4 copper tubing split and then crimped around the damaged capillary tubing. I hope this works or I'll have to remove the heater box for the 4th time now. (1st time to get the box powder coated, 2nd without the valve tubing, 3rd without the spring clips)

Note the nice new gasket for the fresh air intake & for the heater box to the firewall:


Hints for those trying to remove the heater box: Drop the heater control valve. Unbolt the heater box from the firewall, unscrew the freshair intake from the heater box. Slightly cock the upper edge of main heater box and then slide the fresh air plenum towards the battery box (remove battery).


Wednesday, August 18, 2004

Heater box installed!

After many weeks I finally got the heater box put back together and installed in the firewall.


It wasn't that easy to get the main box and the fresh air plenum installed so I hope I don't have to remove the heater core anytime soon. At least I had it boiled and flow tested while it was out of the car. The heater box was powder coated and I got some new rubber parts & gaskets.


So now I I'll have to have a look-see in the transmission for burnt bearing or worn gears. At least I found the gaskets.

Saturday, August 14, 2004

Nuts & Bolts


I am nearly ready to bolt the heater into the car, I have the sheet metal screws, gaskets, rubber bumpers in place. I just want to check a few things before putting some sealer on the two halves and hopefully I will never need to open the heater box assembly ever again.


I also have gotten my blot bin mounted - about 50 or so bins and loaded so I won't have to goto the hardware store as often. Ok that's the theory anyways - I must have $30 in nuts & bolts so far. I made labels to help find the right size. Most are grade 5, with some standard grade 2 and some grade 8 washers (they don't seem to stock grade 5 washers, also Farm & Fleet doesn't stock grade 5 nuts only grade 2 & 8 so for but Rural King does). BTW they sell loose nuts & bolts by the pound so that is how I am able to stock up.

Monday, August 09, 2004

Heater doors

I used a thin coat of polyurethane glue to attach the foam gaskets into the channels of the heater doors.

To provide bushings for the door shafts to the heater casing I decided to use hollow wall anchors trimmed to about 1/4 inch in length.

Pictures may follow in a day or two.

Sunday, August 08, 2004

Slow and steady progress on the heater core (i.e. they built the car around it)

Not much news on the 1800 project front, I have been getting some more parts coated and I ordered some gaskets and rubber parts for the heater assembly. Should be getting the heater core installed and the heater unit back in the car in the next week or so.

Sunday, August 01, 2004

oil, wash & wax

It was time for an oil change, wash and wax for the Madza, the weather was great (high 70's & low humidity) a prefect day to get it done.


I had to remove the bug shield for now as just two screws were holding it on.

The sad news was I noticed some rust bleed through on the rear passenger side fender, still at 9 (& 135,000 miles) years old the truck is running fine.