
 I
broke the distributor cap and then #4 spark plug cable holder - I kept
them on as sacrificial parts to protect more important parts. I also
will remember to check the wiring diagram and the positions of the
switch tabs on the top of the transmission before bolting up into the
tunnel. (while I could plug in the wires blind by feel for OD lockout,
the reverse light switch has three tabs so if I get it wrong the light
will be on all the time and off when in reverse)
I
broke the distributor cap and then #4 spark plug cable holder - I kept
them on as sacrificial parts to protect more important parts. I also
will remember to check the wiring diagram and the positions of the
switch tabs on the top of the transmission before bolting up into the
tunnel. (while I could plug in the wires blind by feel for OD lockout,
the reverse light switch has three tabs so if I get it wrong the light
will be on all the time and off when in reverse)
Friday, December 14, 2012
Engine install slideshow
I
broke the distributor cap and then #4 spark plug cable holder - I kept
them on as sacrificial parts to protect more important parts. I also
will remember to check the wiring diagram and the positions of the
switch tabs on the top of the transmission before bolting up into the
tunnel. (while I could plug in the wires blind by feel for OD lockout,
the reverse light switch has three tabs so if I get it wrong the light
will be on all the time and off when in reverse)
Wednesday, December 12, 2012


Sunday, May 20, 2012
26oz of 134a, 2oz oil = good cold AC
Today I get a later start, go shopping after breakfast, find and remember most of what I need, only get a few things I didn't plan to buy. I pickup a sub and plan to eat it on the water after I recharge the AC in the truck.
I add the oil and leak stop, 4 OZ can - it takes it in a few minutes. Next 12oz of 134a - 3-5 minutes and it is blowing cold again. Still taking both the 2oz of oil/leakstop, 2oz of 134a and another 12 that fast I figure it needs another can. So this time it take a good 10-12 minutes to pull the can empty and now the AC is blowing COLD.
Next to the backyard to fill last nights escape route and then to the garage for the kayak. I get the kayak out from over the busted ES and I go to gather Maggie up - she is no where to be found, not inside, not in the fenced yard. I check and find one gate loose - I had opened them last night when looking for her and must not have closed it, she checks gates.
So another ride around to look for her - but there are lots of people around and she isn't mugging for attention. Then I remember I had the shed open for the shovel...
I head back home and give a call when I come into the yard - barking from the shed. Easy enough I thought - oh no - she had pulled a Bouncer and cornered a opossum under the shed. At that time all I knew she had something cornered - lots of barking from time to time and some growling. I first figured it was going to be one very upset cat.
I call and call and stamp on the floor but she would not come out. So I try to dig near the barking - no luck, frame sunk into the earth. Finally after I consider cutting the floor open I go for my trusty 2 ton bottle jack.
Once I get the front of the shed 8-12 or so inches off the ground I see something grayish with an eye but no Maggie - I was getting worried. When I get the front of the shed 16-18 inches off the ground I can plainly see it is a medium sized opossum but no Maggie - I was worried - did she go into the far corner of the shed to die? I head into the house for a flashlight and who do I find at the door - Maggie. Damn dog did an end run on me to get some water but never came by to let me know she climbed out the other end.
If I didn't live in town I would had got the 22 an shot the ugly thing, if I had a stockade fence I might have used a subsonic round even in town but with a sheriff deputy next door shooting it wasn't an option. I tried to chase it out of the yard using Maggie on a rope and a shovel to poke and prod. All I can say is Maggie had it cornered, she was somewhat tenacious but not really ready to grapple with a opossum to the death - not that I wanted her to get injured in the fight anyways My other option was to beat it to death with a shovel - didn't quite feel up to that today. Yet if I could have used the 22 she had it cornered and set for a shot - ok it is not like opossums are the most cunning animals to hunt, in fact playing possum is their M.O. but she had it set waiting for me to do something.
Now there is thunderstorm is off in the distance and just won't move through, I finally get everything loaded up but it is still there. We head up to the park and sat a picnic table watching the lightning strike to our west but the clouds are not moving much at all. So no evening paddle tonight and just when I get home it finally opens up - of course the boat is face up in the bed of the truck, the engine is still outside..
At least the AC is cold in the truck again.
Saturday, May 19, 2012
Engine out of 1800ES


Next disconnect driveshaft and remove mount
Remove clutch cable, and remaining wiring.
It wasn't too bad pulling the engine, not that much to disconnect. One important note - how strong do you think an oil filter is? Well strong enough to lift the front end of a car off the ground minus the weight of the engine when it jams between the exhaust and the body. I suppose the fact that the engine wasn't able to tilt meant that the transmission was carrying allot of the load but it was no fun getting the filter off - nor removing the socket with 6" extension that jammed between the engine mount and under the exhaust flange supporting the weight of the exhaust system 1/2 back under the car.
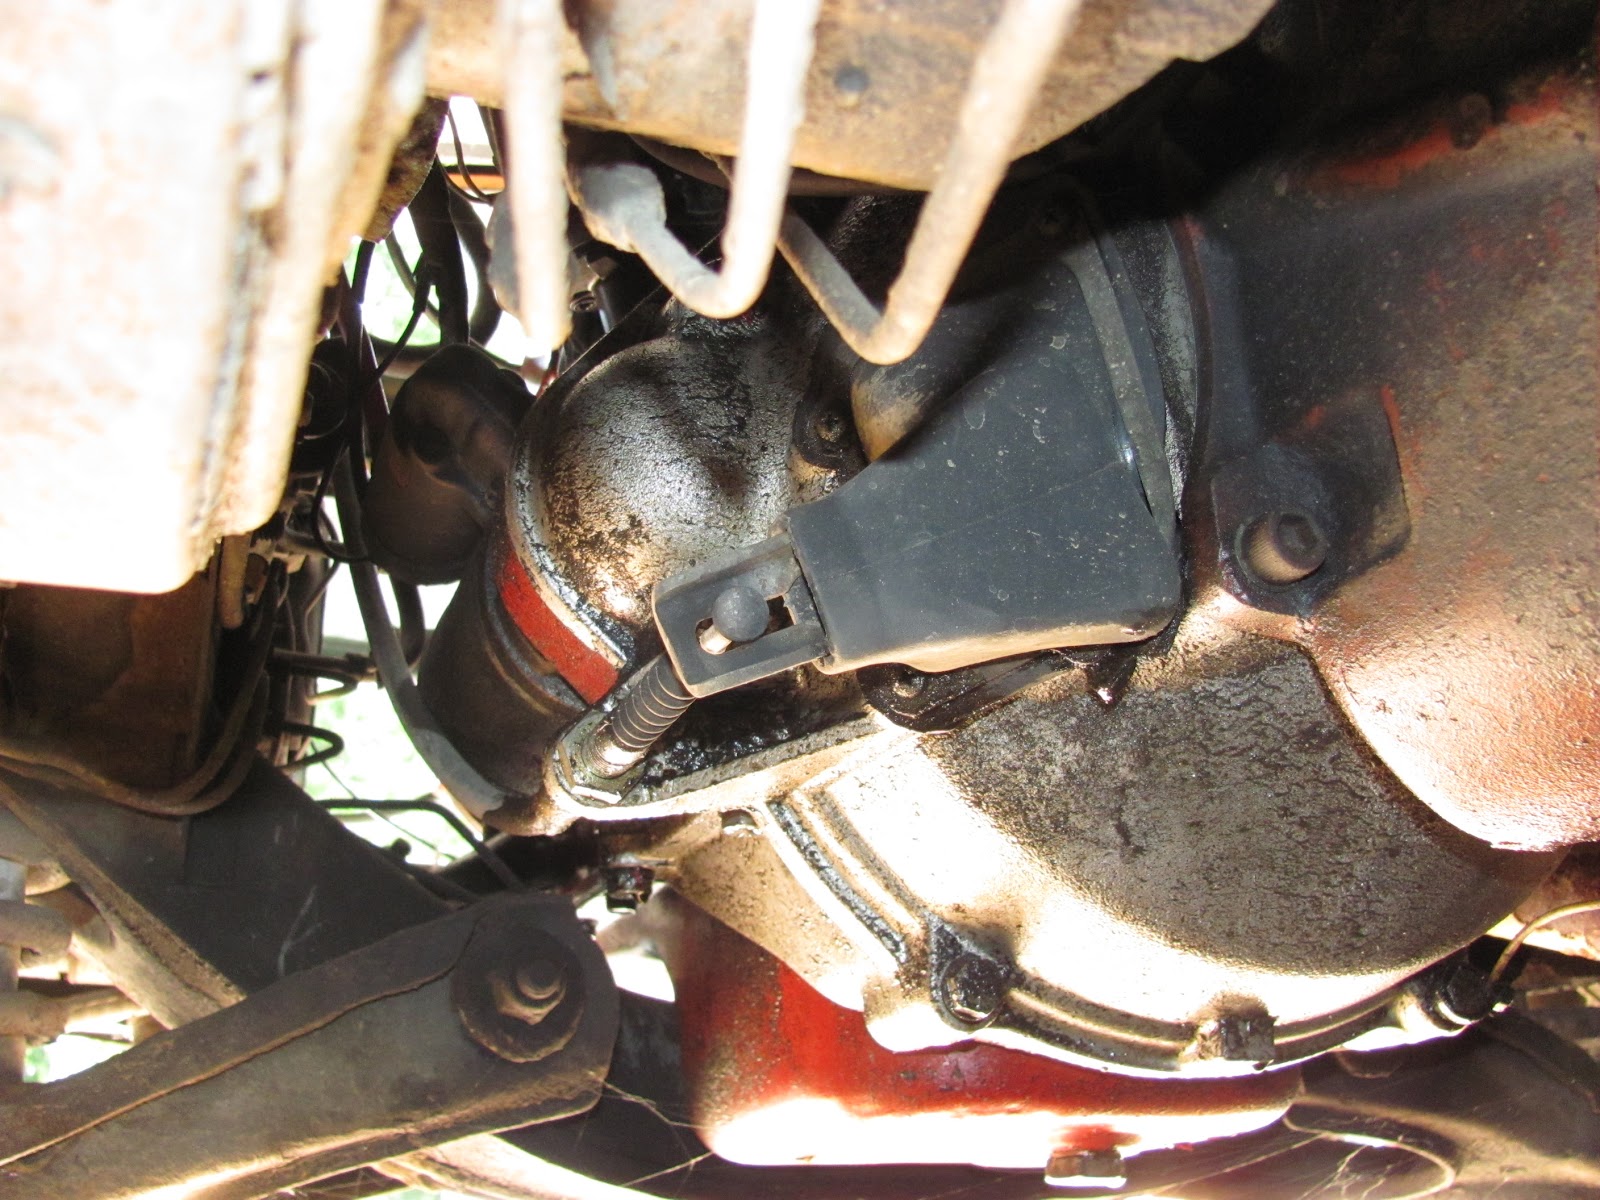 |
| Clutch cable connection to yoke |
 |
| alternator wiring |
 |
| starter wiring |
 |
| thermal timer wiring, oil pressure hose |
 |
| engine coming out |
 |
| engine out but crane about to hit door |
 | ||
| when complementing the purchase of your own engine hoist | make sure to purchase a load leveler |
Of course the last time I did this I had 16 feet of clearance - this time I had to set the unit down and move the chains to hold the unit closer to the crane connection as it was about to hit the raised garage door. Since the lift was 1/2 way out the door I couldn't close the door either - won't be a problem on the '67 - the car is nose in.
 |
| engine clear but transmission and OD to go |
 |
| Engine out! |
So I finally get the engine out and clear - it is about 10 till 8. I go to give Maggie a little attention when I find she released herself on her own recognizance. Fortunately a neighbor down the street saw her walking on her own and invited her in to stay awhile. I looked all over town to no avail -then I got a message at home. They initially called my cell phone but miss dialed.
 | |||||||||
| the hole left by Hilts, too impatient for her evening walk |
Monday, December 19, 2011
Danny's Fried Chicken Franklyn LA
While driving down around the west side of Atchafalaya basin thru Lake Fausse Pointe park to Franklin LA then thru N.O. Got some good Satsuma's from a farm stand. Between Franklin and N.O.
I had lunch at Danny's Fried Chicken in Franklyn LA. Good chicken, had a side of fried okra with it. Figured out they are a chain but must not be a large one and likely dependant of the local operator but if you happen to be in Franklyn LA bypass the FKC on the north side and head for Danny's.

I had lunch at Danny's Fried Chicken in Franklyn LA. Good chicken, had a side of fried okra with it. Figured out they are a chain but must not be a large one and likely dependant of the local operator but if you happen to be in Franklyn LA bypass the FKC on the north side and head for Danny's.
Sunday, December 04, 2011
Q branch style control panel
  |
| I messed up the spacing and didn't leave room for another cigarette lighter sized hold for the optional ejection seat button. |
Wednesday, August 17, 2011

Sunday, June 26, 2011
Missed my fifth run by 1/4 of an inch
Took the ES back for a second day of autocrossing. After my forth run I pulled back into the grid, took off my loaner helmet and returned it to the front of the line. Upon walking back I noticed a pool of coolant under the front of the engine. It was not a blown hose - not good. It was a good thing I brought a trailer.
I got the car home and since it has cooled off I start looking for the leak. I note that when I squeeze the lower hose coolant leaks down the timing gear cover from the front of the engine. Ok, I might get lucky, maybe a blown water pump seal. I pull the fan and pulley bell - no leaking out the weep-hole. The leak isn't from the seals between the pump and the head, nor the heater return pipe or the lower hose pipe seals. So it is either a blown head gasket, cracked head/block or blown water pump gasket.
I have a spare new pump and gasket/seal kit. So I pull the pump. The gasket tears upon removal of the pump - not diagnostic but a promising development. Also some of the gasket looks to be missing, since I am working on the trailer it isn't in the gravel. The other thing I not is that two of the bolts are very rusty, especially on of the short ones from the left side. I clean everything up and look for my gasket varnish - I found the little bottle - I amaze myself sometimes.
I cross my fingers and decide to replace the pump with the rebuilt one. If I still have a leak then something else blew. Before replacing the bolts I take them to the wire brush wheel on the grinder. I clean up four bolts - three long and one short. When I go back for the fourth bolt it is very rusty with it's threads full of gunk and rust. Only about a thread and 1/2 looks used. I check the marking and make sure I have the right bolt - again I dropped it but since I am on the trailer there is just the one bolt and washer. I check the markings, grade 5 bolt but it has different markings than the other three. Then I note that it is shorter than the other short one.
I almost go over to the B18 engine sitting on the stand an remove the bolts from it's water pump - same water pump.
So now I have five bolts for four holes and only two match. One 2 inch, two 1 3/4", one 1 1/4" and on 1". Ok the 2 inch bolt holds the lower radiator hose pipe, the two long bolts are for the top of the pump and the 1 1/4" bolt holds the heater pipe to the pump and the 1" for the left side. No that cannot be right the heater pipe mount is no thicker than a washer - 16 guauge steel, not 1/4 inch difference in length. Now all the bolts but the 1 inch bolts have the same grade markings, then I note that the 1 inch bolt just barely has 2 threads sticking out of the pump housing.
So I do a quick RCI in my head.. Leaking coolant caused by blown water pump gasket -> excessive reving over presurizes the cooling system -> caused by 1st gear out of the Chicago box to the finish where the engine is likely at or a bit over redline (ok not good but if an engine cannot take a moment at redline then something is wrong). The car was not running hot - right on the first line - normal operating temp so it is not an overheating issue. What caused the gasket to leak? Lack of torque caused by only two threads of a short bolt into the block? I didn't measure the torque of the bolts as I removed them but that is my assumption, especally juding from the rusty gunky condition of two bolts - the long one and the 1 inch one from the same side of the engine.
Historical note - I have been fighting a coolant leak from the left side of the engine - right around where the head meets the block - leak down test a few weeks ago ok, not the head gasket. I have replaced fixed radiator cap seals, overflow tank relef cap and check all the hoses - it is either the pump seal but it doesn't leak at idle. Small leak but enough that I must keep an eye on the level to be safe every few hundred miles.
So I cannot prove without reinstalling the short bolt that it caused the problem but I assume it is the root cause of the leak. Now I have some grade five 5/16 bolts in my supply but only 1 inch (grade 2) 1.5 inch, 2 inch and 2.5 inch. I thread two nuts on to lock the length at 1.75 and cut a 2 inch bolt down to size.
Once I coat the gasket in gasket sealer I put the seals in the pump and install. I fit the heater pipe seal and the seal on the lower pipe as well. Ok everything torques down quite well (no I didn't pull the spects and I should have or use a torque wrench - the sun is down and light is fading fast.
The moment of truth - By now it is full dark and I have a stand light when I fill the radiator and tank. Without installing the fan clutch or fan I start the engine to see if it still leaks. After a minute no leaking so I shut the engine down so it doesn't get too hot yet.
It takes a while to swap out the fan clutch and move the fan to a used one but finally everything is back together. I didn't drain the block as this car has a coolant sensor where the petcock is on the B18 and B230 engines but I did drain the radiator and most of the head by pulling the heater core hose (also drained the heater core too).
I start the car up and open the heater valve to full heat - after 15-20 minutes things start to warm up and NO LEAKING!
So my goal to learn how the car handles when pushed was more or less achieved and I identified a weak spot that I had been chasing down for the last 9 months. So I guess I will take her out to another autocross to get some more experience.
So I missed my last run today because someone was too lazy and did find or make the correct size bolt for one they lost when replacing the water pump. I will note that a 1.5 inch bolt would bottom out before tightening the pump to the block. Good news was it happened in a controlled environment where I was able to get the car on the trailer without running it again. This could have been bad had it happened on the open road and I lost coolant with a hot engine - sure it was leaking but the block and head remained full.
I got the car home and since it has cooled off I start looking for the leak. I note that when I squeeze the lower hose coolant leaks down the timing gear cover from the front of the engine. Ok, I might get lucky, maybe a blown water pump seal. I pull the fan and pulley bell - no leaking out the weep-hole. The leak isn't from the seals between the pump and the head, nor the heater return pipe or the lower hose pipe seals. So it is either a blown head gasket, cracked head/block or blown water pump gasket.
I have a spare new pump and gasket/seal kit. So I pull the pump. The gasket tears upon removal of the pump - not diagnostic but a promising development. Also some of the gasket looks to be missing, since I am working on the trailer it isn't in the gravel. The other thing I not is that two of the bolts are very rusty, especially on of the short ones from the left side. I clean everything up and look for my gasket varnish - I found the little bottle - I amaze myself sometimes.
I cross my fingers and decide to replace the pump with the rebuilt one. If I still have a leak then something else blew. Before replacing the bolts I take them to the wire brush wheel on the grinder. I clean up four bolts - three long and one short. When I go back for the fourth bolt it is very rusty with it's threads full of gunk and rust. Only about a thread and 1/2 looks used. I check the marking and make sure I have the right bolt - again I dropped it but since I am on the trailer there is just the one bolt and washer. I check the markings, grade 5 bolt but it has different markings than the other three. Then I note that it is shorter than the other short one.
I almost go over to the B18 engine sitting on the stand an remove the bolts from it's water pump - same water pump.
So now I have five bolts for four holes and only two match. One 2 inch, two 1 3/4", one 1 1/4" and on 1". Ok the 2 inch bolt holds the lower radiator hose pipe, the two long bolts are for the top of the pump and the 1 1/4" bolt holds the heater pipe to the pump and the 1" for the left side. No that cannot be right the heater pipe mount is no thicker than a washer - 16 guauge steel, not 1/4 inch difference in length. Now all the bolts but the 1 inch bolts have the same grade markings, then I note that the 1 inch bolt just barely has 2 threads sticking out of the pump housing.
So I do a quick RCI in my head.. Leaking coolant caused by blown water pump gasket -> excessive reving over presurizes the cooling system -> caused by 1st gear out of the Chicago box to the finish where the engine is likely at or a bit over redline (ok not good but if an engine cannot take a moment at redline then something is wrong). The car was not running hot - right on the first line - normal operating temp so it is not an overheating issue. What caused the gasket to leak? Lack of torque caused by only two threads of a short bolt into the block? I didn't measure the torque of the bolts as I removed them but that is my assumption, especally juding from the rusty gunky condition of two bolts - the long one and the 1 inch one from the same side of the engine.
Historical note - I have been fighting a coolant leak from the left side of the engine - right around where the head meets the block - leak down test a few weeks ago ok, not the head gasket. I have replaced fixed radiator cap seals, overflow tank relef cap and check all the hoses - it is either the pump seal but it doesn't leak at idle. Small leak but enough that I must keep an eye on the level to be safe every few hundred miles.
So I cannot prove without reinstalling the short bolt that it caused the problem but I assume it is the root cause of the leak. Now I have some grade five 5/16 bolts in my supply but only 1 inch (grade 2) 1.5 inch, 2 inch and 2.5 inch. I thread two nuts on to lock the length at 1.75 and cut a 2 inch bolt down to size.
Once I coat the gasket in gasket sealer I put the seals in the pump and install. I fit the heater pipe seal and the seal on the lower pipe as well. Ok everything torques down quite well (no I didn't pull the spects and I should have or use a torque wrench - the sun is down and light is fading fast.
The moment of truth - By now it is full dark and I have a stand light when I fill the radiator and tank. Without installing the fan clutch or fan I start the engine to see if it still leaks. After a minute no leaking so I shut the engine down so it doesn't get too hot yet.
It takes a while to swap out the fan clutch and move the fan to a used one but finally everything is back together. I didn't drain the block as this car has a coolant sensor where the petcock is on the B18 and B230 engines but I did drain the radiator and most of the head by pulling the heater core hose (also drained the heater core too).
I start the car up and open the heater valve to full heat - after 15-20 minutes things start to warm up and NO LEAKING!
So my goal to learn how the car handles when pushed was more or less achieved and I identified a weak spot that I had been chasing down for the last 9 months. So I guess I will take her out to another autocross to get some more experience.
So I missed my last run today because someone was too lazy and did find or make the correct size bolt for one they lost when replacing the water pump. I will note that a 1.5 inch bolt would bottom out before tightening the pump to the block. Good news was it happened in a controlled environment where I was able to get the car on the trailer without running it again. This could have been bad had it happened on the open road and I lost coolant with a hot engine - sure it was leaking but the block and head remained full.
Tuesday, December 14, 2010
Only drove Altima 5500 miles
I had the tires rotated on the Altima today, it had been a year (367 days in fact) so I figured it was time. When I checked the paperwork I figured I only drove the car 5500 miles in the last year. That seams low.
I drove the truck to NJ in the summer and the Volvo/rental to DC then to Atlanta for Thanksgiving. I'll have to figure out how many miles I drove the truck and Volvo - I had been putting 8,000-10,000 on the Altima a year and roughly 12-15K per year.
In any case the tires are still good and rotated on time.
I drove the truck to NJ in the summer and the Volvo/rental to DC then to Atlanta for Thanksgiving. I'll have to figure out how many miles I drove the truck and Volvo - I had been putting 8,000-10,000 on the Altima a year and roughly 12-15K per year.
In any case the tires are still good and rotated on time.
Monday, October 25, 2010
New gas supports for the ES

Well I only purchased two gaskets but I was able to get both gas cylinders installed this evening and I even managed not to burn my porkchops on the gill. The cylinder ball ends had the nice spring locking system so I didn't have to removed the screw from the glass. Of course I removed the screw from the glass on the first one before I found the springs. I suppose I should have looked in a manual or something.
In any case now that the cool chill of fall has arrived I no longer need to worry about the glass coming crashing down. As far as I know the rear windows are not made anymore so it was not work risking the glass for want of weak lift cylinders.
Saturday, October 23, 2010
&*(*#*^&( spare cable broke
I went to check my spare tire under the truck for dry rot since I am considering a pair of new tires for the front to match the newer pair on the rear. All I found was a rusty cable hanging there - I am 99% certain it was there when I changed the oil in April.
Thursday, July 29, 2010
Fan Clutch


I went to replace the fan clutch in my recently acquired 73 ES. I got a part but by the time got it old one off I realized it is not the correct part.
My question is do I have the correct fan and clutch combination or perhaps was an alternate part swap out over the years

Tuesday, June 29, 2010
A shade tree doesn't help when the heat index is 98
With the heat index topping 98 degrees the shade from the tree was of some benefit but it was a hot day to be changing brake lines. The front end when smooth - all the old fittings broke loose - I even held off when the service manual recommended the expense of special wrenches to prevent stripping or rounding off the fittings. (I would have driven straight to Sears just as soon as I began to round of a fitting using an open 2 sided wrench.) I had no problem loosening and of the fittings or the 8 bleeders. I hit the fittings with a blast of simple green using a air driven engine cleaning gun, dried it with more air, a short spray of PB Blaster, a little heat from a heat gun then a bit more PB Blaster. I got things just hot enough to soften the rubberize under coating on the fittings up next to the chassis.
The only problem I had was one lug nut did not want to move - cross threaded - I broke the stud just using my foot and the tire iron. This was not good as one of the wheel stud right beside it was already stripped. Since there was nothing for me to do I continued with the rest of the lines - the rear lines were it better shape than the fronts but I had the SS lines so I replaced them - they were the hardest to break free at the pressure reducing valve but still nothing rounded off.
I pulled the rear disk and looked at the hub - no way for me to remove if like the brake drum/hub on the '67 with a tapered shaft to put on a press. I thought about drilling or driving the old studs out in place but decided that this was a job for a shop. I reattached the rear caliper and went onto bleeding the system until new clear fluid came out.
The bleeding with the pressure tank worked well other than the cap did not fit quite right and just before the 8th bleeder was opened it popped off and sprayed brake fluid all over the engine and fender. I grabbed the bucket of strong detergent and quickly rinsed the fluid away then followed up with some more soapy water and the hose.
When the job was done I put the three nuts on the rear wheel and slowly drove the car to the shop as few blocks away. It was one of the best $60 I have spent.
So far the brakes work great - no pulling or dragging - good solid stops. I have yet to fully test the system but I have the felling that the brakes will easily exceed the friction limits of the tires if I really push it. The nice thing is no spongy feeling to the system. Now I just need to get a brake warning switch but more on that later.
Wednesday, June 23, 2010
Lights, washer, alternator light
I started cleaning the garage tonight and found the old washer pump, tank/bottle and mount. I didn't know if the motor worked and the impeller was not attached and the bottom of the pump was off. I tried to fix it before but the bottle leaked so in the end I purchased one from ebay and set the broken one aside.
So what do you know - I purchased a car without a washer bottle and pump. It only took a few minutes to fix the impeller and using a heat gun to warm the plastic so the bottom would snap in. Then I found some scrap wires with terminal ends - I filled the bottle with some water and touched the wire leads to the battery and it pumped water out. Of course I need to fix the leaky bottle and mount the mounting basket then run hoses but I will soon have a windshield washer. I then studied the wiring diagram and owners manual for location of the washer bottle. I found a yellow wire (more orange and black than yellow) but it is in the right place and when I hooked it up and pushed the button on the dash the motor ran.
Having figured out the wiring diagram (source page) I also replaced the fuse for the left side marking lights. Once replaced the lights work and now the instrument panel lights but the ALT light stays on. I think this is a common problem and not a charging problem (description of problem and solutions). Good news is almost all the lights work now - still need the licinece plate lamps to get the car ready to pass tech inspection for rallys (of course not having an accurate speedometer is a bigger problem for ralling).
Next I will try to get the lights on the bumper to work - then I will work on the corrosion issues issues in the fuse-block (tech article)
Note garage is not yet clean enough to get the second 1800 in.
So what do you know - I purchased a car without a washer bottle and pump. It only took a few minutes to fix the impeller and using a heat gun to warm the plastic so the bottom would snap in. Then I found some scrap wires with terminal ends - I filled the bottle with some water and touched the wire leads to the battery and it pumped water out. Of course I need to fix the leaky bottle and mount the mounting basket then run hoses but I will soon have a windshield washer. I then studied the wiring diagram and owners manual for location of the washer bottle. I found a yellow wire (more orange and black than yellow) but it is in the right place and when I hooked it up and pushed the button on the dash the motor ran.
Having figured out the wiring diagram (source page) I also replaced the fuse for the left side marking lights. Once replaced the lights work and now the instrument panel lights but the ALT light stays on. I think this is a common problem and not a charging problem (description of problem and solutions). Good news is almost all the lights work now - still need the licinece plate lamps to get the car ready to pass tech inspection for rallys (of course not having an accurate speedometer is a bigger problem for ralling).
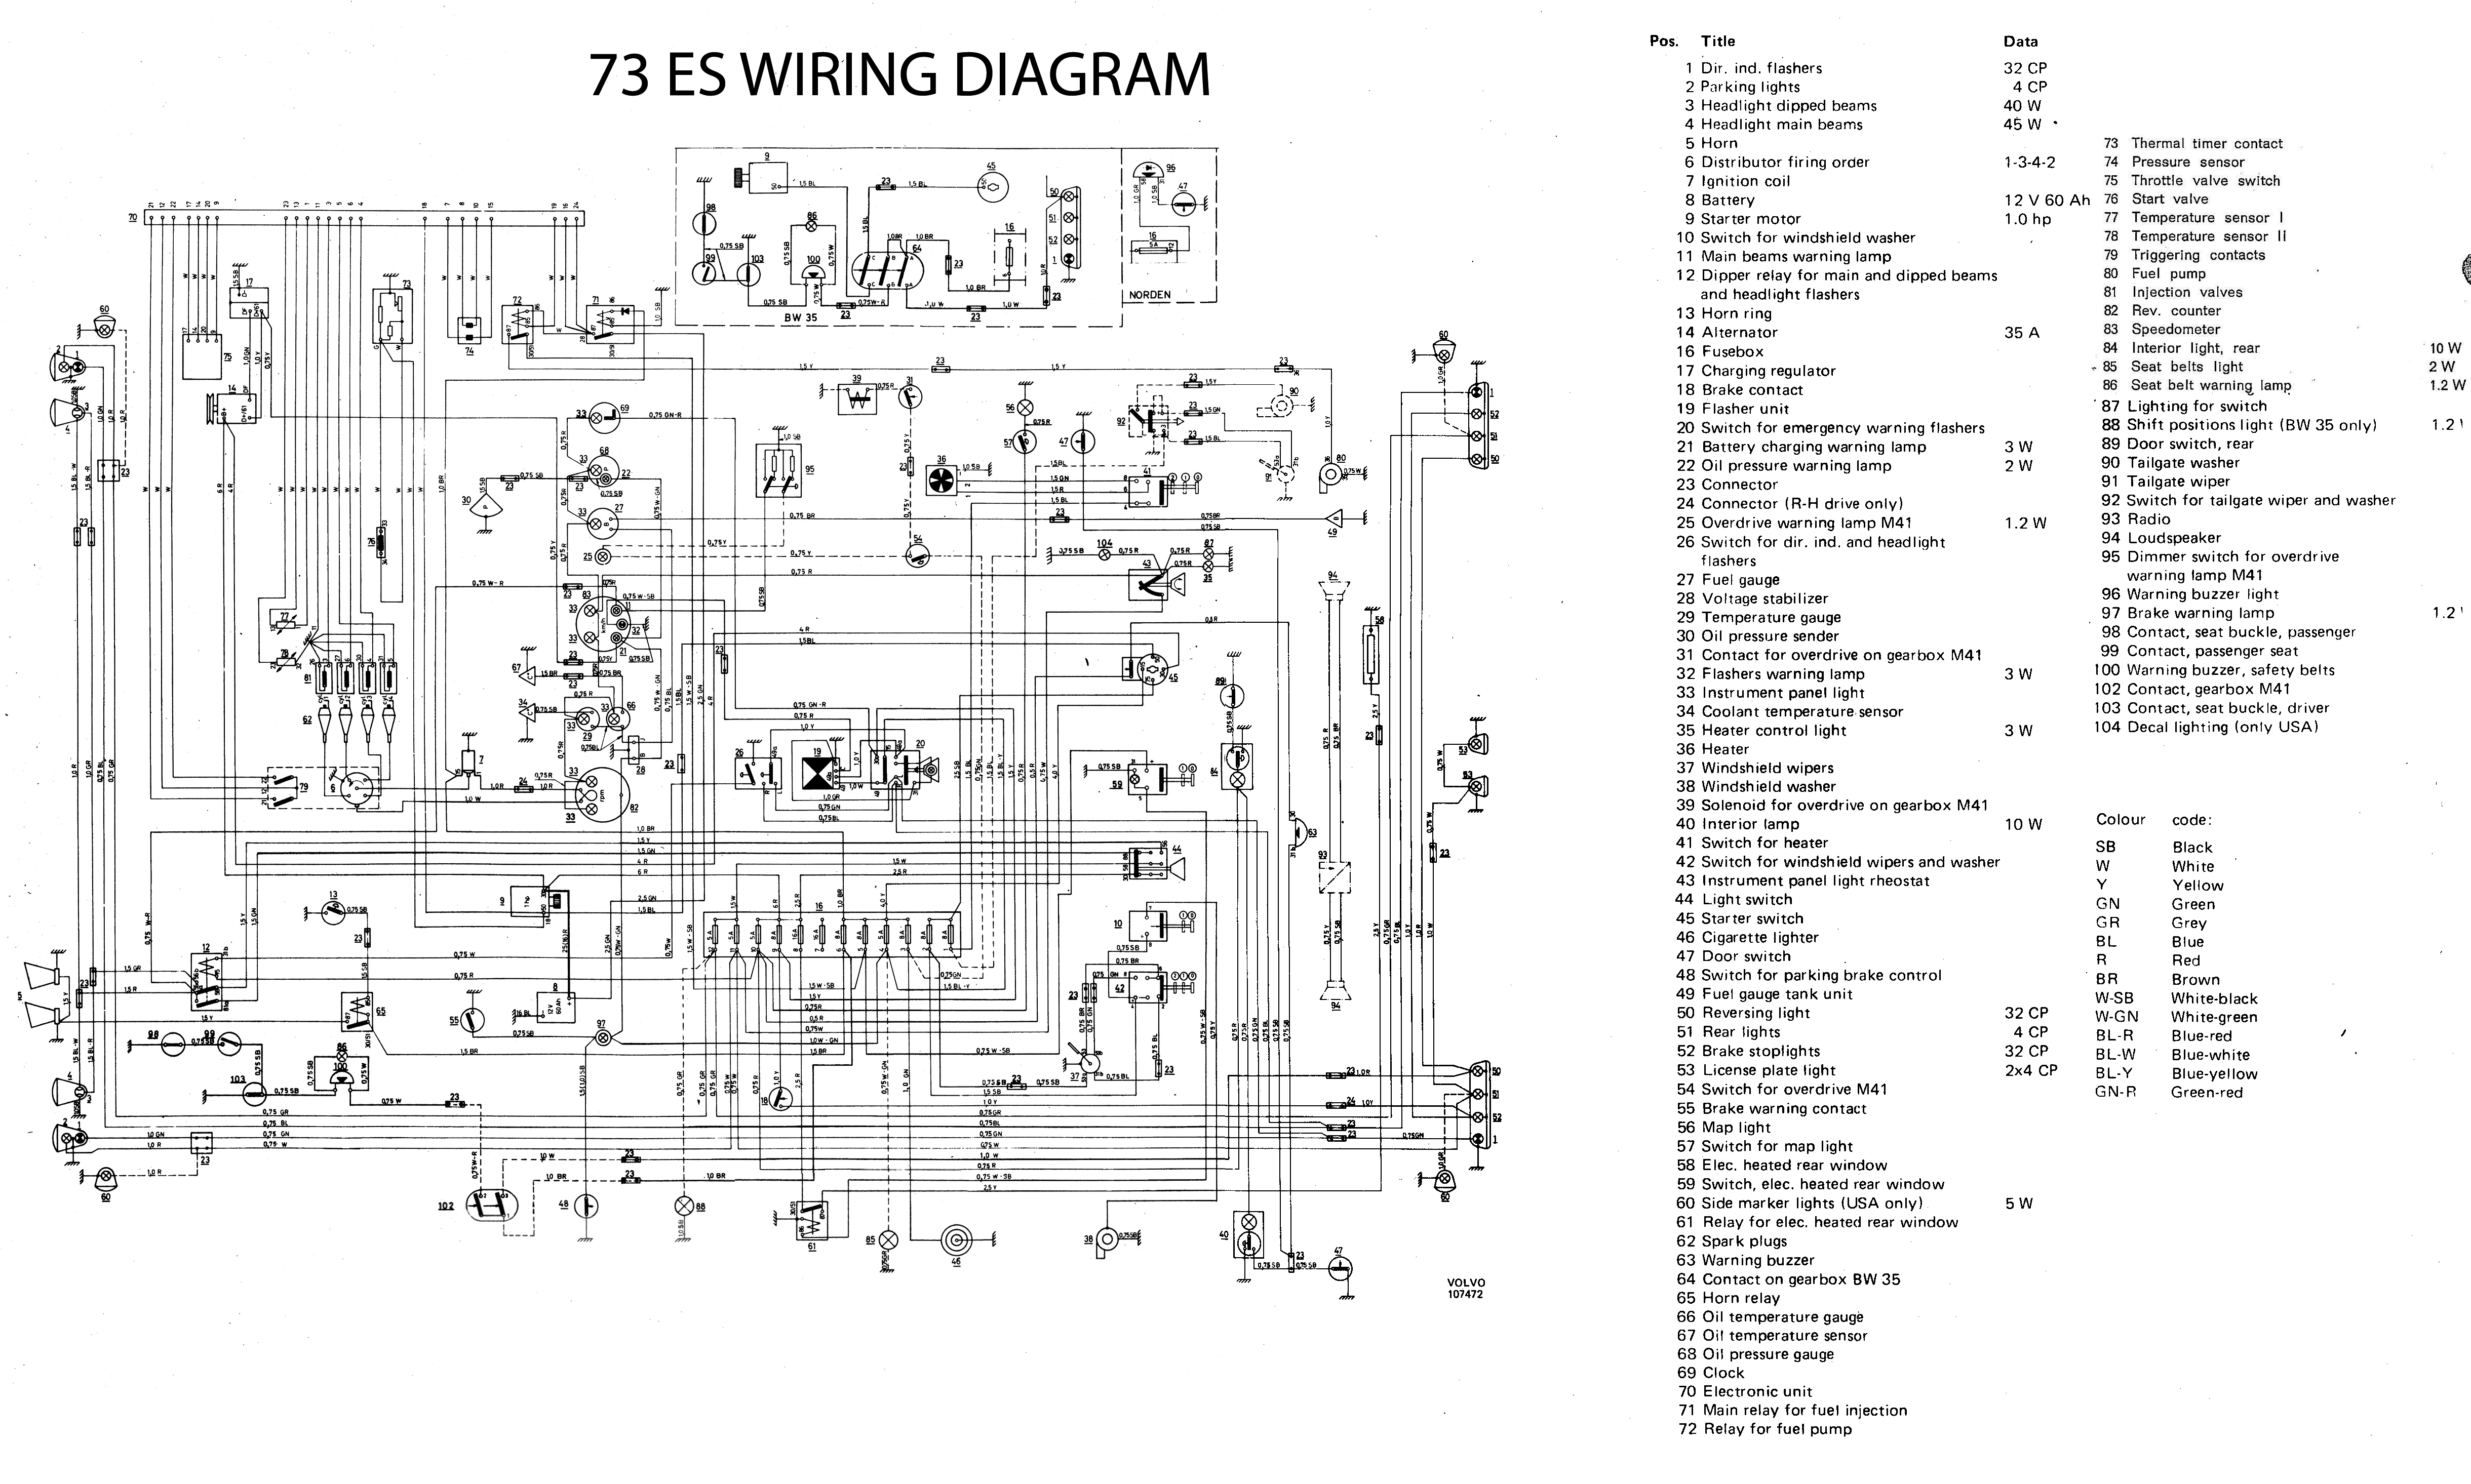
Next I will try to get the lights on the bumper to work - then I will work on the corrosion issues issues in the fuse-block (tech article)
Note garage is not yet clean enough to get the second 1800 in.
Monday, June 21, 2010
About 400 miles so far on the ES
I have about 400 miles on the ES so far - so far so good. The only major problem I have found is that it doesn't like to start when hot. Stopping for a few minutes such as a fill up is no problem. Leave the car for 20-30 minutes and it won't fire. Give it another 20 minutes (or open the hood for 10) and it will restart and run fine. I am going to start reading on the fuel injection system.
The other problem I have noticed is the fuel pump is loud when less than 1/3 tank - by loud I mean it is very noticeable while idling and it can be heard over the rest of the noise at speed.
I have an order in with iPd for brake lines, new raditaor cap and the correct spark plugs.
The other problem I have noticed is the fuel pump is loud when less than 1/3 tank - by loud I mean it is very noticeable while idling and it can be heard over the rest of the noise at speed.
I have an order in with iPd for brake lines, new raditaor cap and the correct spark plugs.
Friday, June 18, 2010
Frozen hinge
 A common problem with 1800 hoods is the hinges rust and stop moving. Of course it is possible to open the hood but the steel bends. I wanted to make sure Lisbeth didn't have this problem, she did. So off comes the hood - going to need some welding - might need a wire welder - so with some PB Blaster, oil and elbow grease I free the hinge.
Click on image to goto the album - see captions for details.
Tuesday, June 15, 2010
Added another 1800 to the stable

Pre purchase album
Monday, April 05, 2010
New Battery
Went to breakfast this morning, drove the truck as it has sat for 2 weeks. Started and ran find but the battery was dead when I left the restaurant. 
So I am sitting there with no jumper cables - ok I had a set of cables but no tools to connect them. I check and what do you know bingo I have my booster pack. No luck - a slow turn over then click, click, click, click.
I get a jump from someone with cables and I head to Walmart for a new battery. I know the current one is old and I hope Walmart is open on Easter Sunday.
I pick up a new battery $77 - not a great price but they didn't have the smaller 2 yr battery in stock. I head home and turn off the truck - no restart, no radio - deader than dead - some funny relay sounds from the steering column.
I put the charger on the battery for 30-40 minutes - 40 amp fast charge. Just some funny clicking and when I try to start everything goes dead. I try 200 amp boost - click, click, click...
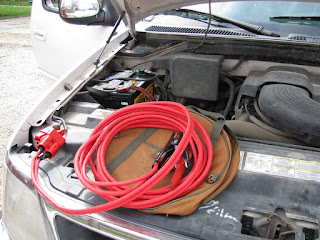
So the battery is dead and not taking a charge or something is wrong with the electrics. It is a no maintenance Motorcraft battery so unless a new battery was installed before 2001 this is the original battery - it lasted 13 years. The old battery comes out and I replace the terminal mounts as well. I also install my jumper cable plug - using the post of the hood support to hold it in place.
Everything works - truck cranks and starts great. The hood closes but for the time being I will need to open the hood to use the jumper cable plug. I can close the hood when charging. I have some longer cables to install but I need new plug contacts to solder the new cables to so I can again mount the plug down on the bumper.
I check the charging system, good, the new battery good. The old battery weak - under 500 cca (was a 750) and around 11.5 volts. For a 13 year old battery one cannot complain - it got me through the winter with just a little bit of maintenance from the float charger from time to time. The new battery is a 850cca with a 3 year replacement warranty. Now I just need to turn the core in for a $9 refund.
My plug jumper cable system installed. If I had a 7/16 wrench with me today I would have been ready to jump.


So I am sitting there with no jumper cables - ok I had a set of cables but no tools to connect them. I check and what do you know bingo I have my booster pack. No luck - a slow turn over then click, click, click, click.
I get a jump from someone with cables and I head to Walmart for a new battery. I know the current one is old and I hope Walmart is open on Easter Sunday.
I pick up a new battery $77 - not a great price but they didn't have the smaller 2 yr battery in stock. I head home and turn off the truck - no restart, no radio - deader than dead - some funny relay sounds from the steering column.
I put the charger on the battery for 30-40 minutes - 40 amp fast charge. Just some funny clicking and when I try to start everything goes dead. I try 200 amp boost - click, click, click...
So the battery is dead and not taking a charge or something is wrong with the electrics. It is a no maintenance Motorcraft battery so unless a new battery was installed before 2001 this is the original battery - it lasted 13 years. The old battery comes out and I replace the terminal mounts as well. I also install my jumper cable plug - using the post of the hood support to hold it in place.
Everything works - truck cranks and starts great. The hood closes but for the time being I will need to open the hood to use the jumper cable plug. I can close the hood when charging. I have some longer cables to install but I need new plug contacts to solder the new cables to so I can again mount the plug down on the bumper.
I check the charging system, good, the new battery good. The old battery weak - under 500 cca (was a 750) and around 11.5 volts. For a 13 year old battery one cannot complain - it got me through the winter with just a little bit of maintenance from the float charger from time to time. The new battery is a 850cca with a 3 year replacement warranty. Now I just need to turn the core in for a $9 refund.
My plug jumper cable system installed. If I had a 7/16 wrench with me today I would have been ready to jump.


Sunday, April 04, 2010
My big old tool box

I unloaded my big tool box this morning. By big - I mean it was built on a pallet to fit in the bed of a PU truck. So now what to do with it?
I did find some missing tools - my glue gun, tap and die set, rotozip circle cutter.

It has a nice set of drawers that I am going to move to another tool cabinet in the garage. (see the last image) It is a little heavy to move without a forklift - it was built on a pallet to serve as a HD box to moved around with a forklift so I could store my tools at work (in the old days) before I had a garage.
About the only idea I have is to mount some pipe or 2/3's and use it as a canoe transport box. The problem is it was never really built to be water proof - it was built to get a little wet but not really for highway use in the rain. With some better hasps it would make a nice storage box for camping and canoeing.
Of course I just now need to figure out how to get it back into the truck - I pushed it out this time.


Subscribe to:
Posts (Atom)